Wednesday, April 17, 2019

The latest


Saturday, December 17, 2016

Art and Space: Living in your art

One of my Favorite artists is John Howe. You may not have heard of him, but I can guarantee you probably have seen his work, or at least its influence. As well as being a prolific illustrator of fantasy, Howe was one of the concept artists for the Lord of the Rings Trilogy. If you put some of his landscape paintings next to the establishing shots in the movies, there is hardly a difference. And for the scenes in Bag-End, they actually transported the actors into one of his illustrations. John Howe also journals a lot on his website.

Yesterday I was reading one of Howe's journal entries, and I was struck with the thought: "this man lives in Middle Earth, he lives in his art".

It takes a rare artist to accomplish this step.

Where do I live?

I have been exclusively making jewelry in my studio (we'll save details for another post) and there is a certain amount of satisfaction missing from the process. Satisfaction, a certain feeling of meaning making in the images that I am unable to capture when crafting jewelry (I will call it "wearable art" when it attains the status)

Living in your art.

Where do you live?

Tuesday, January 8, 2013

Hardbound Thoughts

The reality of the distant present chipping away: Bark from a Tree

Revealing little mealy worms, too small for the carrion eaters circling overhead
The next idea, like the last, circles

An idea, impossible to know

Inner and Outer. The Frame of Reference. Point of View. Case in Point
Pointing to the next Right Thing. Becoming, carrying into the previous six ideas
Concentric, eccentric

Hardbound times, like an impossibly heavy book
Only good for pressing flowers. Decayed and flat memories of the warmth of a day in the distant present

A clock running, counting unpercieved numbers like bomb
in a womb, adding by ones, fives and tens to the Next Idea

Saturday, February 4, 2012

Finishing Up

I finished a sketchbook.

Those of you who are like me will understand how utterly amazing this is. I usually start several sketchbooks and I get stuck because of any number of reasons:

The sketchbook is too big.
It's too small.
The paper too thin.
The paper is too thick.
The paper is too bumpy or smooth.
The sketchbook is too pretty and I couldn't possibly mar it with my unworthy sketches.

For some reason a Molskine Sketchbook is Goldilocks's favorite.
I have actually finished (after 4 years) a sketchbook.


Here are some highlights:


Click here for larger versions.

Sunday, September 11, 2011

Motivation

Recently, completely on a whim, I joined The Sketchbook Project. Basically, you choose a theme, give some money and they send you a sketchbook that will eventually go on a tour around the country "like a concert". (It says "World Tour", but your books only travel in your own country which I rather thought was false advertising)

Anyway.

My book finally arrived with my theme of "Uncharted Waters", which feels relevant to a land locked desert rat with a secret love affair with all things nautical.

That's what I thought until I realized that everything that I think about so far is charted. Is misguided cartography the same as something that is uncharted? Perhaps if you were trying to get somewhere it would be. But they are still a guide, my little maps. If something is charted, even if incorrectly, it wouldn't fit within this theme.

Uncharted Waters ought to be something I don't usually do. Uncharted Waters implies a metaphor, something that we stray from when we're away from the college/art/poetic world for a time. Whatever it means ought not to be over-thought, which is definitely what I'm doing.

I'll just be over here, drawing in this tiny, post-consumer recycled sketchbook.

Monday, January 17, 2011

Wire wrapping


Saturday, August 28, 2010

Art and Space: The Studio

The hardest part of being an artist is all the stuff. I love my stuff. I need my stuff. This becomes a problem when you live with someone. When I lived alone, my dining table was covered in art projects and supplies and the walls surrounding it were covered in sketches in the manner of a stalker. Paintings were drying on the balcony, paintbrushes littered the bathroom sink. Unfortunately, most artists can't afford to live alone, or fortune smiles on us and we find ourselves not alone. So, the stuff suddenly becomes a burden to the roommate/partner/husband/wife. There are ways to get around this. If you have the extra space, it's always good to dedicated it to art. If not, there are some tricks.


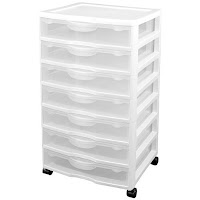
Get plastic drawers.
I swear by these suckers. You can get them at any department store like Walmart, Kmart and Target. I found one of mine next to a dumpster (along with the biggest canvas ever!) I think they're better than bins since there isn't so much space that you overfill and can't find anything. At the same time, they come in a lot of different sizes to fit your big and little needs.

Dedicated Space

Let's face it, you are going to need to leave something out. Be it drying media or gremlins made time go faster, something will need to stay out. Have a somewhat orderly space for this. Pick somewhere out of the way like the counter in the second bathroom or a small table in the corner. Give yourself a break, never expect to be perfectly clean.

Get in the Closet

Have a walk-in closet? Instant studio space! I've never tried this, but my mother is giving it a go. If you don't have a lot of clothes, or you use a dresser, why not use your closet as a tiny art room? You can remove the coat racks from the wall and suddenly you have elbow room. Sure, it's cramped, but then no one will want to come in there to bother you.

Go outside

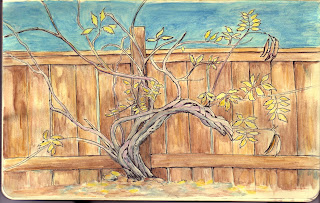
Okay, not every artist lives in New Mexico (although, it seems like you can't swing your bag without hitting one) but if the weather is good, the yard or the balcony can be a good place, weather permitting, particularly for painters.

Get a Room

If you have extra money, a studio space might be worth it to you.
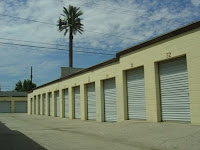
There are some self-storage facilities that have climate control, and may be more cost-effective. Keep in mind that if you sell, you will likely need to sell elsewhere, your self storage security might not be amused.

Friends with Space

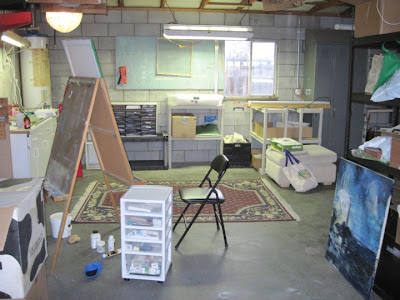
I have finally lucked out with my art-making space. My partner bought a house with a separate two-car garage that is mine - ALL MINE!! However, I didn't immediately forget the trials of being an artist, so I share my space with a fellow artist (although, this roommate doesn't need me to be clean). Sharing a space with someone who has similar needs definitely helps. Find someone who will share a corner of their garage, or who will split a studio space with you. Or get lucky, like me ;)


Friday, January 8, 2010

Student Work

The most beautiful thing in the world to me is not my art, but the art that my students make.

Here are some examples from my jewelry students that I am very proud of (posted with permisssion):


Sunday, October 25, 2009

Be an Artist Teacher Not an Art Teacher

I recently got a job teaching art. I teach jewelry at a High School and I've noticed a few interesting facts about teaching.

1. They love boundaries. If you make them get a tardy slip from the office every time they're late, they like you more. If they know that they are allowed to go to the bathroom, they won't ask for a pass as often.

2. If you are nice to them, they'll be nice to you.

3. Most kids in high school are not afraid of fire unless they have actually been on fire.

4. Everything you say is a reference to sex.

5. When you become an art teacher, you can kiss your own art goodbye.

Number 5 is probably somewhat of an exaggeration, since I do create some class examples. But it isn't quite the same. Just like any job, you don't take it home if you can help it (which is nearly impossible as a teacher) and thinking about it brings you back to thinking about the kids. So this leaves me to ponder making art and trying not to think about the theft, the vandalism and the attitude, but trying to think of the handful of excited students who will become wonderful artists or wonderful artistic people. Hopefully, when I think of making art again, I will have paper before me and a pen in my hand and no thought in my head.

Sunday, April 12, 2009

Travel Art Kit

I get my best work done while I'm away from home. Unfortunately, I like using watercolor and it gets a bit messy. I could use watercolor pencils, and I do, but sometimes they don't quite do what I want them to.

An alternative to the messy and embarrassing fiasco of bringing all of your paints to your local coffee shop, you can make your own watercolor kit out of an Altoids tin.

I can't take credit for this brilliant idea. Here is the link to the Instructables Site where I found it. However, I will take credit for improving on it.

Supplies: Altoids tin, paper clay, acrylic varnish

Clean out the Altoids tin. Soap and water. Better to be safe than sorry since wet sugar can attract nasty critters.

Here is the improvement: Paper Clay.
Paper clay is made of volcanic ash, talc, water, starch, wood pulp, preservatives and fairy magic. This stuff doesn't require baking, yet it dries hard.

Mold the paper clay into little holes for your watercolor paint. I smoothed out the cups with the butt of a Sharpy marker. I only made eight. You could probably make ten, like the brilliant JP from instructables, but I lack the clay molding chops for that sort of endeavor.

Let the tin dry. I actually forgot about it for a few days and it dried quite nicely. Consult the package for the minimum drying requirements. If you live in a humid climate, I suggest trying my tactic.

After your watercolor tray is completely finished drying paint on several coats of acrylic varnish. I used three coats over several days. Again, consult the minimum dry-time instructions on the label of your product since most of you are probably not as absent-minded as I.

The next step is to simply fill the holes with your watercolor tubes. I used primary colors and burnt sienna plus its relatives. I figure this is a personal decision.

Now that you have your watercolor kit, you can always go back to Instructables to make the $1 Waterbrush. I however lost patience and bought an $8 waterbrush at my local art store.

Enjoy!